Required Materials:
A System76 Star1 Netbook
A small Philips screwdriver
A small flat head screwdriver
Guts
New Mini PCI express wireless card (if you are planning on upgrading your wireless)
Step One:
The first thing you need to do is...
WAIT. Before I continue, I feel the need to warn you that this WILL break any warently on your device, and that I am not responsible if you Computer quits working, breaks, or kills your friends and family. If you take a part YOUR computer YOU are doing it at YOUR own risk. Now that thats clear. The real step one!
On the botton of the Star1 netbook, you should be able to see a grand total of 8 screws, all of which need to be taken out. 1 the of 8 is hidden under the removeable panel located right about your QIN pin and SN. Once you are done with that, it is time to remove the keyboard
Step Two: Keyboard
This one can take some guts to do, and you can damage your keyboard durring this step if you are not careful. Take your flat head and look right above your f8 key, f12 key, and f1 key. There are little tabs that help hold your keyboard in place, and that is where we need to CAREFULLY pry the keyboard up, as shown in the pic below. Once you are under it the keyboard pops out. You will need to lift the black tab holding the keyboard cable to the mother board to fully remove the keyboard (shown below)


Step Three: More Screws
Now that the keyboard has been removed and all the screws from under the netbook have been removed, its time to remove the ones that were hiding under the keyboard. There are a total of 6 that get removed just like any other screw out there, but pay attention to where the screws are because you need to put them back where they were. There is a pic before for reference if you forget.
 Step Four: Removing the upper casing
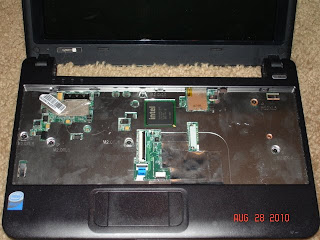
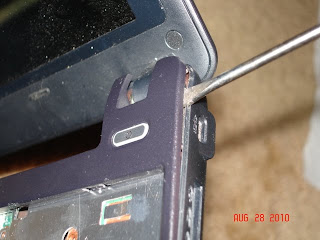
Now that all the screws are out, its time to remove the the upper part of the case. The first thing you will want to do is remove the ribbon cable holding the mouse in. It comes out just like the keyboard on did so it should not be a major problem. The case, should how just pop off. I recommend using the flat head screw driver to pry it open by the power button, like shown below.
 Step Five: Removing and upgrading the wireless card.
 Step Five: Removing and upgrading the wireless card.
There is one screw holding in the wireless card on your computer seen in the lower right hand corner of your computer. Detach the grey cable from the card and remove the screw driver and you can pull the wireless card right out of the computer. If you are upgrading the wireless card, simply put the new one in, put in the one screw, and attach the grey cabel to the spot labeled MAIN. Thats it! Your card is upgraded!


Step Six: Reassembly
While it is possible to disassebly the computer farther, if you main goal was to replace the wirelss card that you have done so. If you want to rebuild you computer now, you just follow this guide backwards. Anything that poped off with snap back into place with a little push (Keyboard and case) any cables that were removed can easily be put back in, and all screws should be put back in the computer. If you want to disassemble the computer futher for some reason, just start unpluging cables and removing screws. Its pretty simple. Below you can see just how far apart this computer can be taken. You should be able to go as far as upgrading the hdd and ram, but that is at your own risk and may not work.
 Congratulations! If everything went well, your netbook is online with your new wireless card. If not, leave a comment or email me at [email protected] and I'll see what I can do, but remember, you rebuilt your netbook at your risk, so please don't email me if you didn't read the whole guide or chose to ignore something. Any emails insulting me or yelling at me for breaking their computer will get forwarded to my automatic mail sorting program, /dev/null. Thanks for reading this how to, and enjoy you upgraded wireless ability!
 Congratulations! If everything went well, your netbook is online with your new wireless card. If not, leave a comment or email me at [email protected] and I'll see what I can do, but remember, you rebuilt your netbook at your risk, so please don't email me if you didn't read the whole guide or chose to ignore something. Any emails insulting me or yelling at me for breaking their computer will get forwarded to my automatic mail sorting program, /dev/null. Thanks for reading this how to, and enjoy you upgraded wireless ability!